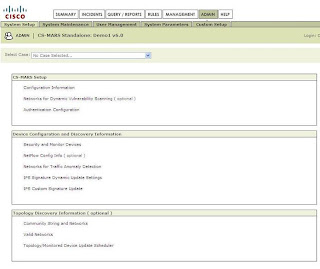
Mounting and booting the device will bring up the services and prompt you for the username and password. The default username and password of MARS is 'pnadmin'. PN refers to the Protego Networks, who developed this product and later acquired by Cisco Systems.
The forthcoming steps are as follows
- Resetting the password.
- Assigning IP address, gateway and verify the connection.
- Setting the local time and timezone.
- Take the console through the browser for the GUI with a https connection.
- Use https://ip_address_mars
and this step will ask you to confirm the certificates. - Use the pnadmin username and password to login and you can view the summary page of MARS.
Summary - Query/Reports - Rules - Management - Admin - Help
Admin tab is used to manage and maintain the device.

The Admin-> System Setup-> Configuration Information option, will have the necessary information about the MARS's IP address and hostname. Other details such as Email Gateway, Email doman, DNS IP address can be provided there. Email gateway is required to alert the users with e-mails. So, the mail server's address should be provided in that column. The DNS address is required to access the internet to update the IPS signatures. Updating the IP address and host name will require a reboot. The next step in the implementation will be the integration of devices.
Integrating devices with MARS
The list of devices supported directly by MARS is available in the following link.
The devices which are not listed in the link are not supported directly by MARS. But there is an option to customize the logs from those devices in MARS and make them a supportable ones.
- Auto Discovery of Devices through SNMP
- Manual addition of individual devices
- Importing large number of devices using the Seed file option


Go to Admin->System Setup->Valid Networks option and select the valid network IP/ranges of your network and Click the Discover now option. This will make MARS to go through the range of network provided and will discover the devices with the SNMP community.

The discovered devices can be found in the Admin->System Setup->Security and Monitoring Devices option.
The next two methods of integrating devices will be covered in the forthcoming posts.
Kindly leave your suggestions such that I can make the blog useful to everyone.


0 Comments. Click here for your Comments:
Post a Comment