Viewing Traffic


How to see the traffic flowing from the integrated devices to MARS ?


In this post, I will let you know the procedures to view the traffic from the reporting devices and the terms used in MARS.

Three parameters to be understood before getting into this. They are as follows.

Events - Each and every log which comes from the reporting device is matched to some predefined values and MARS understands what the log reports and convert that into an event. Event is counted and numbered.

Sessions - Events that are correlated collectively by MARS at NAT boundaries. They are also counted and numbered. To say in detail, session will contain the full transaction of a traffic.

Incidents - Events when matched by the Rules will be triggered as an alert. Incidents can be alerted to users through e-mail, SMS etc.


Before proceeding with the MARS, we have to ensure the following
  • Logging has to enabled in the reporting devices. It can be Syslog, SNMP trap, RDEP etc.
  • Logs should be reachable to MARS. There should not be any blocks for that.
  • If syslog is used, Informational traps can be used to have all the related logs.
Query/Reports tab can be used to view the log from the reporting devices. This page will have some filter options to retrieve the data from the device.


This filter options will be used all through the Query, Reports, Rules etc. Let us query a reporting device for its raw messages which were retrieved for the past ten minutes.

Go to the Query/Reports tab and click Any value available in the Devices option. This will take you to the Devices page where you can select the devices from the right pane.

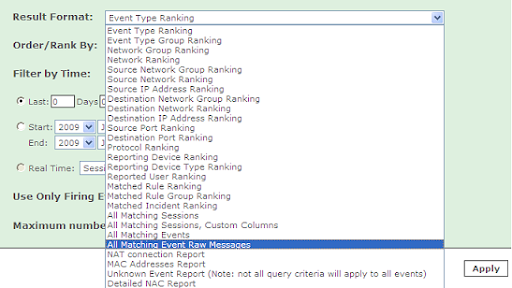
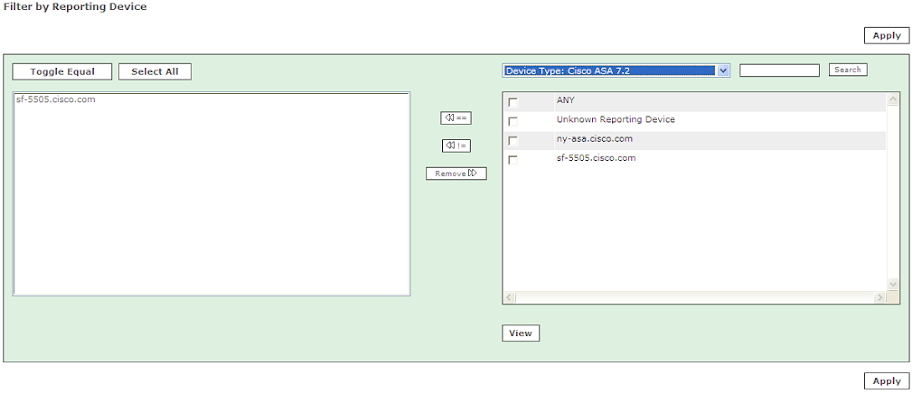
A list of device types will be available in the right pane. It can be used to select the specific device type and it will list the devices which comes under the type. Select the device and Click the Left arrow button and click Apply. Click the Edit option in the Query page and it will take you the option of selecting the result format. The drop down list available there will contain some result formats. For this instance, select the All Matching Event Raw Messages option.

Then select the time for which the result data should contain. Click Apply and then Click Submit Inline option. This action will query the MARS database and produces the raw messages for the past 10 minutes.


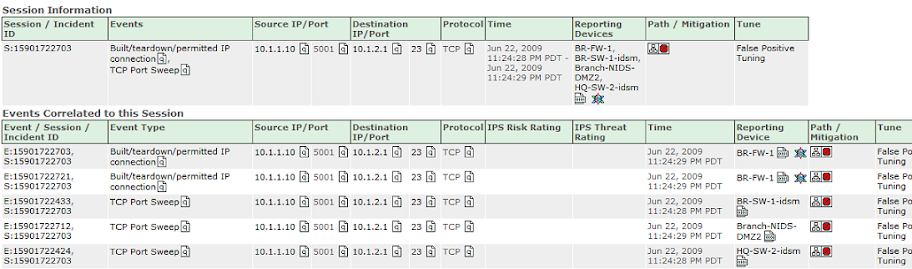
The result will contain the Event /Session ID, Event Type, Time, Reporting Device and the Raw message which was received by MARS.


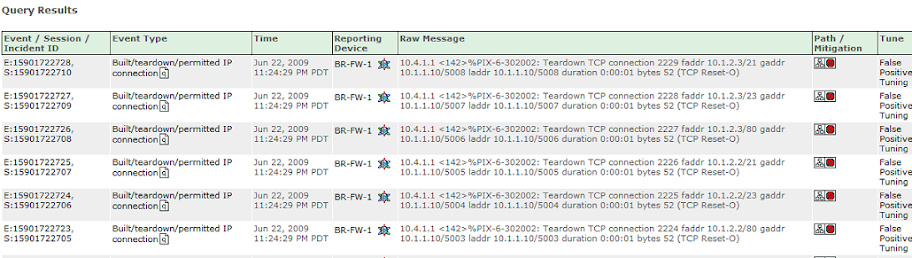
In the picture shown above, the result page has an option called Path/Mitigation. By clicking that option, a graph which shows the path of the traffic will be displayed. Below that, if there are any recommendations that can be done by MARS will be displayed.

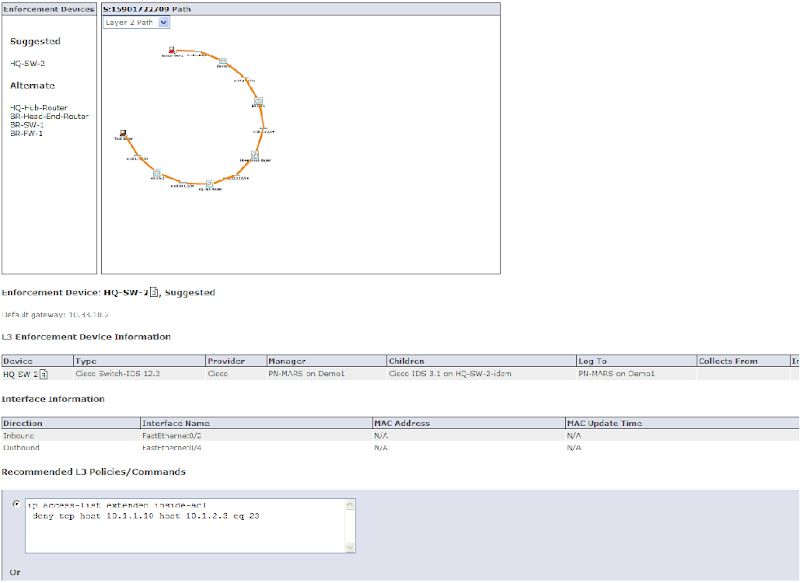
So that option will be used for the mitigation steps.

If you can see the result, each and every output will have an event ID and session ID. If you click the Session ID, it may contain some correlated events. It can be seen in the picture below. So, this makes you to understand the flow of traffic and how it is correlated here in this session.


This method can be used to view all the traffic related to any devices integrated with MARS. There are many filtering ways available. For example, if you want to search any traffic which comes from any specific source or destination IP, you can provide the filter options and can query with that.

I hope this post will be useful. Kindly write to me for your queries.

Keep reading and suggesting to enhance the blog.


Getting Started - IV


Integrating devices with MARS - Continued

The third method of integrating devices i.e. Importing the list of devices using a seed file.

What is a Seed file?
Its an spreadsheet file which contains the details of the devices such as hostname, Reporting and Access IP, Access Types, Login names and Passwords, enable password etc. So, whatever details required to add a device manually has to be entered in this sheet collectively for all the devices.

The instructions to create the seed file is available in the following link.
http://docs.google.com/View?id=drd8342_1hffc8pfs

This file has to be saved as a .csv file and to be uploaded to a FTP server where MARS can access. Go to Admin->System Setup->Security and Monitoring Devices and select the option Load from Seed File.

This action will take you to a page where the details to access the seed file has to be provided. The IP address of the file share server. The login to fetch the file and the path of the file. Submit the window with details. Once it verifies the data provided, MARS will start discovering the devices listed in the file and will add to it. It can be verified in the Security and Monitoring Devices page.


Things to be noted

  1. The flow of column mentioned in the link above should be followed exactly. It should not be changed and the values to those fields should be mentioned correctly. If the column is labeled as 'Empty' no value should be filled in that.

  2. If the provided device details in the seed file is wrong, that particular device will not be added to MARS.

  3. If the provided details such as Access types, enable password, Login is wrong in the file, then MARS will discover that particular device with the provided SNMP RO. This can be verified by editing the device in the Security and Monitoring Devices page. Later, the correct login credentials can be provided and discovered again.

  4. This importing process will not tell you the exact count of device added. We have to check this manually in to the list.

  5. While providing the details of the file in the Load from Seed file option, the exact path has to be mentioned such that MARS can reach and fetch the file.
So these points will make you to execute this process in a systematic way.

And this is how we Integrate devices with MARS in three methods. The added devices can be seen through a map in the Summary tab. It will show you the topology graph of all the devices added.

If you come across any queries regarding the Seed file importing you can write to me. And the next post will contain the flow of traffic and reading the events from devices.

Keep reading and keep suggesting to enhance this blog.

Getting Started - III


Integrating devices with MARS - Continued


The second method of integrating devices to MARS ie Manual integration of devices can be done as follows.
Make a list of devices which has to be added with the details such as hostname, IP address, SNMP community, Login, password and enable password in case of any Cisco Hardware devices.


Go to Admin->System Setup->Security and Monitoring Devices and click the Add option.
This will take you to the page which will ask you the information about the device.

Device type drop down box will contain a list of natively supported hardware and software devices. I will explain in detail about the steps to add a hardware device and a software device with an example.


To add a hardware device such as ASA firewall for example, follow the procedure.
Select the device type from the column relevant to ASA with version.

Access IP : It is the IP address through which MARS can access the device. So, provide the IP address of the ASA firewall so that MARS can access it.

Reporting IP : It is the IP address by which MARS receives the events. ie. The IP by which ASA reports MARS.

Access Type : It is the option by which MARS access the ASA firewall.

Other option such as Login, Password, Enable Password, SNMP RO community can be provided such that MARS can access ASA.


Click the
Discover option after providing all the details. If the provided details are right and if MARS can access ASA, the discovery will be successful and the device will be added to MARS.

Else there will be an option to view the error. Click the
View Error option if you get any errors while discovering.

After successful integration, it can be verified by checking the list of devices available in the
Security and Monitoring Devices Column in the Admin tab.

Lets take a Software device integration. For example, I will add a Windows 2003 Server and the Oracle Application present in it.

Go to
Security and Monitoring Devices->Add. Select the Add SW security apps on new host option from the Device Type column.
Provide the details of the server. Here, Operating System column will be used to mention the kind of OS in that host. Clicking the Logging Info button will prompt you for the type of Windows Server and the choice of selecting the logging method. Better select the Receive option.

Apply the settings and then click Next. This action will take you to the Reporting Applications tab. Select the Oracle application which is relevant to the server. Click Add option next to it after selecting the application. It will take you to the Oracle server settings page. The oracle login credentials and service should be provided there. Test Connectivity and Submit.


By submitting the settings, the Oracle application will be added to that Reporting Application tab. Any other application can also be added in the same way. The added application can be viewed in the same tab. The settings can be modified anytime.


If you are
Done with the settings the host will be added to MARS. It can be viewed in the list of monitoring devices. If you find a red coloured button at the top right column by named Activate, click that to activate all the changes made.


So, this is how you add the supported devices to MARS individually.

You may may some queries at this point of time.

Why is the Login, password and enable password required while adding hardware devices?

Mars can use this login credentials to access the device and understand the configurations of the firewall. It may use those configurations and it recommends some corrective action to be made at the time of any threat detections.

While providing the Logging method in adding a Server we select the Receive. How will Windows log events?

Windows cannot send any logs directly to MARS. There is a agent software called Snare, this software will forward the event viewer logs to MARS. Snare is recommended by Cisco Systems.


The next post will contain the third method of adding the devices.

Is this blog useful ? Your suggestions and comments are welcome.

Getting Started - II


Setting Up MARS in your network

Mounting and booting the device will bring up the services and prompt you for the username and password. The default username and password of MARS is 'pnadmin'. PN refers to the Protego Networks, who developed this product and later acquired by Cisco Systems.

The forthcoming steps are as follows

  • Resetting the password.
  • Assigning IP address, gateway and verify the connection.
  • Setting the local time and timezone.
  • Take the console through the browser for the GUI with a https connection.
  • Use https://ip_address_mars and this step will ask you to confirm the certificates.
  • Use the pnadmin username and password to login and you can view the summary page of MARS.
Tabs which are available in the console are

Summary - Query/Reports - Rules - Management - Admin - Help


Admin tab is used to manage and maintain the device.


The Admin-> System Setup-> Configuration Information option, will have the necessary information about the MARS's IP address and hostname. Other details such as Email Gateway, Email doman, DNS IP address can be provided there. Email gateway is required to alert the users with e-mails. So, the mail server's address should be provided in that column. The DNS address is required to access the internet to update the IPS signatures. Updating the IP address and host name will require a reboot. The next step in the implementation will be the integration of devices.


Integrating devices with MARS

The list of devices supported directly by MARS is available in the following link.


The devices which are not listed in the link are not supported directly by MARS. But there is an option to customize the logs from those devices in MARS and make them a supportable ones.

There are three methods of integrating the devices to MARS. They listed as follows:
  • Auto Discovery of Devices through SNMP
  • Manual addition of individual devices
  • Importing large number of devices using the Seed file option
Lets see the auto discovery option. To do this, SNMP community string has to be registered in MARS. Go to Admin->System Setup->Community String and Network option. Provide the community string in the text box and provide the network IP/range in the text boxes and add to the list. Submit the saved community string and networks.


Go to Admin->System Setup->Valid Networks option and select the valid network IP/ranges of your network and Click the Discover now option. This will make MARS to go through the range of network provided and will discover the devices with the SNMP community.


The discovered devices can be found in the Admin->System Setup->Security and Monitoring Devices option.


The next two methods of integrating devices will be covered in the forthcoming posts.


Kindly leave your suggestions such that I can make the blog useful to everyone.


Getting Started - I


Implementing MARS in Network

I guess you have a little idea about this appliance now. So, let me take you to the part of implementing this system in a network.

Things to Understand before implementing


  1. This device will not work automatically and save you from the threats by blocking the traffic.

  2. Each and every day the security analyst has to look into the incidents and tune it according to their network policy to work effectively.

  3. This device is not a monitoring tool which gives you the results such as the machine status, the cpu utilization or the disk utilization etc.

  4. This device will monitor the security and network events through the syslog or any other logging methods from your network devices and hosts. Correlates it and helps you to take actions.

  5. It should be kept inside the network just like a computer which needs an IP address and hostname with the option of accessing the local network and Internet to update its IPS signatures.

  6. There are two LAN ports. One port can be used to collect the data from the network. Other port can be used to manage the device. Both the ports can not be in the same LAN / VLAN.

  7. An NFS server can be used to take the backup of configurations of the device and the events logs collected which can be used in the future or to recover after a disaster.

  8. MARS supports a list of devices directly which includes some third party devices and applications. The unsupported devices or applications other than that list can be integrated to MARS and customization has to be to make it a supported one.

The next post will contain the methods of integrating network's devices and hosts to MARS.

Your suggestions are welcome to enhance this blog.

Cisco Security MARS - An Introduction


Welcome Friends !


This blog is about the Security Information Management system CS-MARS from Cisco. This blog will contain the information about the product, updates, working techniques and queries.

I hope that I can make the posts useful to all the Security analyst and the users of the product. Add your comments and queries to make this blog more useful.

To start with, everyone should know what is MARS. MARS stands for Monitoring, Analyzing and Response System.

To say in simple terms, this appliance MARS will collect all the event logs from your network devices, security devices and hosts. It correlates all the raw logs and gives you a valuable information about your traffic. It differs from a Syslog server by this correlating behaviour and its threat mitigation recommendations.

Technical Specifications

  • It is an Appliance
  • Pre-hardened Linux based OS
  • Oracle database
  • Hot swappable Raid 10 HDD in the latest models
  • Disk Space depends on the model of the appliance. Minimum is 500 GB
  • 2 x RJ-45 10/100/1000Base-T LAN
  • Collects 1500 events per second in the lower end model
Major Benefits of using MARS

  • MARS has a wonderful reporting option which can be used effectively to generate reports from all the devices and to generate Audit compliance reports.
  • Lots of Predefined reports are available and reports are customizable.
  • All the events which are collected in MARS can be viewed real-time.
  • Threats for the network can be analyzed and the mitigation methods can be derived using MARS.
  • Logs from all the devices can be stored for a long time and can be used whenever needed.
  • Network traffic can be drilled down and analyzed for the incident investigation.
  • MARS can be used as a single point interface to monitor all your network device events.
  • Alerts the users for incidents through e-mail, sms etc.

I hope the post will describe the product clearly and my presentation is clear. Kindly type down your comments to improve and to rectify my mistakes.